Okay, so you understand how distillation works and now you are very curious as to how you can start doing some home distilling right? This page is going to take you through the very exciting process of home distillation. If you do not know the basics of distillation please click here so you can understand the basics.
This article covers distilling alcohol only, it does not talk about making the mash, if you want to learn how to make mash (which is then distilled) click here.
The hardest parts of home distilling is collecting and getting the equipment and supplies needed for distilling alcohol (mostly the still)
What You Will Need:
- Mash *If you don’t know what this is or how to make it click here to learn* or any alcoholic product you want to distill
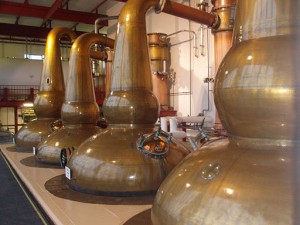
- A pot still, this is the most important yet hardest to attain and most unfamiliar piece of equipment. A a still where the entire distillation process occurs in.
- Access to a source of heat (stovetop, open fire, heat plate, etc)
- Access to water and ice.
- A collection jar with measurements for initial alcohol
- A collection jar for final alcohol product
- Dish Soap
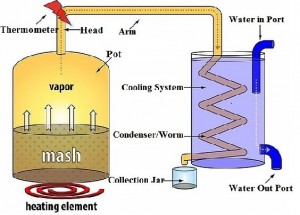
Now that you have all your equipment let’s go over the most mysterious item, the still. As mentioned previously the still is homebase for the distillation of alcohol. The pot still is what we will be using and talking about. We will start by going over the parts of the still and their functions:
Parts and Functions of the Still:
- The first part of the pot still is the pot, seems obvious right? The pot is exactly what you are thinking it is, quite literally a pot in which you put the alcohol you that will be distilled (the mash). This is where the undistilled alcohol is stored and heated up, as it heats up in the pot the alcohol turns to vapor and travels into the head.
- The second part is the head this is simply where the steam from the evaporated alcohol goes to first and the temperature is measured since there is usually a thermometer here, it should read between alcohols boiling point (173 degrees Fahrenheit/78 degrees Celsius) and water’s boiling point (212 Fahrenheit/100 Celsius).
- The third part can have several names including swan neck or the column this part is connected to the head and is essentially like a roadway for your alcohol to travel to the condenser (the next part).
- The fourth part is called a condenser or worm. This is the final place that the alcohol is in the form of steam as it is CONDENSED back into a liquid (so you can drink it). The condenser can be a long coiled pipe or a straight pipe that has some length to it. The condenser is cooled by some form of cooling system (next part)
- The last part is the cooling system, this is what will cool the steam while it is in the condenser allowing it to go back to a liquid state. Usually the cooling system is a bucket of ice/ice water in which the condenser is put into, this is simple and effective. Sometimes a slightly more complex cooling system is used, this involves a running supply of water cooling down the condenser, this is usually used when there is not a coil but rather a small pipe for the condenser. This works by having a larger pipe/covering over the condenser (which carries thealcoholic steam) and having a water in and water out nozzle in which the cold water constantly flows in and out.
Take a look at the diagram below to better help you visualize what the parts are and how they work together

Preparation:
At this point you should have your still and your mash (click here to learn about mash). Preparation is very simple and easy and it boils down to these few things
- Make sure there is a cooling agent to your condenser, this means ice and water, or a constant supply of cold water. Note: There is no such thing as too cold, better to over do the cooling than under do it because then you may lose alcohol vapor because it isn’t cool enough to condense to liquid.
- Make sure you have a reliable heating source capable of heat around 185 degrees.
- Make sure you have allowed yourself enough time to complete the still’s run, you do not want to have to do it at two or more different times.
- Position your still so it is on the heating source and ready to go (don’t turn the heat on yet)
- Measure how much mash you have (doesn’t need to be exact just close)
Starting Your Still Run:
All the hard stuff is over now! Gathering materials and preparing is the majority of the work when it comes to distilling. You are now ready for your first still run! The steps are as follows:
- Pour your mash into the still’s pot.
- Close and secure the top of the pot/head down. Depending on the type of still you have this step will vary, make sure everything is air tight by using the required clamps if they are part of your still.
- Once everything is secure and tight you now apply the heat.
- Watch the thermometer and make sure the temperature is remaining between alcohol’s boiling point and water’s boiling point. (A good range is between 185 degrees Fahrenheit and 195 degrees Fahrenheit)
- As alcohol starts to come out of your still collect it in the container with measurements on it, you do this because you want to discard the first 45 mL (about a shotglass) of alcohol produced for a 1 gallon mash. This is done because the initial alcohol produced is not safe to drink, it is methanol as opposed to ethanol (the alcohol we want to drink).
- After the initial methanol alcohol is discarded put your permanent collection jar and allow it to fill up until no more alcohol drips out.
- Once the alcohol stops dripping out you can turn off the heat and be proud of yourself for completing your first still run!
Finishing/Cleaning Up:
Allow your still some time to cool and then disassemble it (if it is capable) and empty out your mash that is left over. Then clean out your pot with hot water, dish soap, and or white vinegar. Make sure the still is rinsed out of the mash and clean and then dry off any excess water with a towel.
