Simple Wine Recipe
If you are looking for a simple wine recipe to make at home then you have come to the right place, this is page going to outline the easy process to make homemade wine as easy and simple as possible.
*Please note that this homemade wine recipe and process is one for a quick and easy wine, the result will be great, however please do not go into this endeavor expecting a top shelf wine at the end, if you do want a a “real” wine then you need to go the page for making fancy homemade wine.
STEP 1: What You Will Need
The first step to making any homemade alcohol is determining and gathering everything that you will need. One of the nicest aspects of this simple homemade wine is that you will not need many ingredients or equipment, what you will need are as follows:
- A juice drink of your choice (any flavor will work, grape juice is a popular choice) it must be 100% juice and unopened
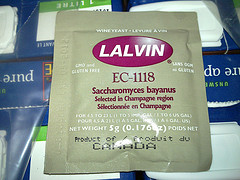
- A packet of champagne/homebrewing yeast (alternatives will be discussed)
- An airlock (alternatives will be discussed)
- Sugar (cannot be artificial sweetener) *this is not necessary but can add to the quality of your wine*
- A hydrometer *also not necessary but can be helpful, this will be explained*
This is ALL that is required to make your own homemade wine and be enjoying it in no time at all. Seems to good to be true doesn’t it?
STEP 2: The Airlock
After you have all of your materials and ingredients you need to assemble and prepare everything so that you can begin to make your homemade alcohol.

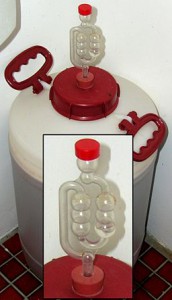
An airlock on a container, water is put in the top to create a one way escape for gas in the container.
There is very little you need to prepare for this step however it is CRUCIAL that you do it correctly otherwise your product will suffer.
Put into simple terms alcohol is made when yeast “eats” a nutrient (in this case sugar) and the byproduct is alcohol. During this process (fermentation) a gas called carbon dioxide (CO2) is released, this causes a buildup in pressure in the container the developing alcohol is in; and unless this pressure has a means of escaping you are going to be left with one messy situation and no alcohol! Unfortunately you cannot simply leave a top open or have a hole in the container to let the gas escape because then air will go into your container and that will ruin your developing alcohol!
So this is the solution…an airlock! Airlocks are devices that allow the pressure/gas escape from the container you are making your wine in but doesn’t allow air to go in that will ruin your product! These work by having a “water barrier ” in the tubing. They are very inexpensive and it is HIGHLY recommended that you invest in a couple of them as it will greatly benefit your product. One can be purchased VERY inexpensively, click here to get some for around 2 dollars.
The other option is to use a balloon or a (spermicide and lubricant free) condom; to use these you simply place the balloon or condom over the mouth of your container and after the fermentation process in underway (this will be made clear later on) within a few hours you should see it start to inflate, once this happens poke a few (three or four should be fine) small holes with a needle in the balloon (or condom). This will accomplish the same thing as the airlock however you will get better results if you use the airlock.
STEP 3: Prepping the Fruit Juice
This is where the fun part starts, you will actually start to see how the actual wine-making process takes shape!
You begin by taking your unopened juice container and cracking it open and pour out approximately 1 cup of the juice (or drink it!) Be very careful to not let the cap get contaminated by touching it with other things in your kitchen, this can ruin your alcohol! Always cap your container if you are going to leave it unattended.
*OPTIONAL STEP: The Sugar
At this time you can add the sugar if you have chosen to do so, approximately 1 cup per 64 fluid ounces is a good measurement to use, it does not need to be precise. Put the cap back on and shake the bottle until the sugar is mixed in with the juice.
STEP 4: Adding the Yeast
Now the time has come to add the main alcohol making ingredient: the yeast. To have the best outcome I highly recommend using a yeast specifically designed for wine or champagne, it is also very inexpensive and it will give you the best taste and quality alcohol content. I have used bread yeast found at the supermarket before and I will be honest it gives the alcohol a not so pleasant taste, also I found that I did not get as high of an alcohol content with bread yeast.
Open up your packet of yeast and put it into your juice, you can use less of the packet if you would like but I found that using the entire packet produces the quickest results with the best alcohol content, feel free to experiment with using less or more but I have found 1 packet works well. Put the cap back on the juice and shake gently for a couple seconds to mix the yeast into the fruit juice.
You can buy 10 packets of high quality yeast specifically for wine making for around 50 cents a piece here.
STEP 5: Putting the Airlock On
Now you have your future alcoholic beverage ready to go, it just needs to ferment and then your innocent fruit juice will transform into a delicious, homemade adult beverage. You just need to put on an airlock and let it sit.
To put the airlock on your container it is very easy, simply take your cap from the fruit juice and put the center of it under a flame for a few seconds, just so that it becomes soft and you can easily puncture it. Take a knife and begin to carve a small hole so that you can stick the end of the airlock through it. You want the airlock to be as snug as possible while in the hole in the cap so you may have you make the hole slightly bigger until it fits tightly.
Once you have achieved this then you can either make the cap a permanent airlock (so you can reuse it for future wine making!) by sealing it in with some super glue (from the outside where it will not be exposed to the wine) or you can simply put a little bit of tape on top of the cap to make a temporary seal (and remove the airlock from the cap when your wine is finished).
Once the airlock is attached to the cap screw the cap (with the airlock on it) to the fruit juice. All you need now is to add a little bit of water to the airlock and you are ALL DONE! If you are not using an airlock then simply place a balloon or condom (without spermicide) over the mouth of your container, after a few hours it should begin to inflate, at this time you simply poke a few holes into the balloon or condom with a needle.
Congratulations, you now just have to sit back and relax and let nature work by fermenting your homemade wine. You are very close to completing your simple wine recipe!
STEP 6: Finishing Up
You should let the wine sit and ferment for at least 5-7 days before ending the fermentation process. I usually let it sit for 10-15 days when doing this kind of wine making. After I decide to end the fermentation process I put the wine through a strainer just to clear any sediment that may be in the wine from the yeast, a coffee filter works great. This step is not a requirement as there is nothing harmful that is being filtered out.
Another finishing touch you may want to consider is using a hydrometer, a hydrometer is a device that will tell you what percentage of alcohol your wine is, not necessary but very useful as it is very nice to know the proof (alcohol percentage) of your product. Hydrometers are not expensive, you can buy a state of the art one perfect for wine and beer making here.
Click here to learn about hydrometers and how to use them.


